The hardest part of an infrared sauna install is never the sauna. It is the 20-amp circuit, the clearance you did not plan for, and the ventilation nobody mentions until the wood starts cupping. Most home cabins need a single dedicated circuit, a few inches of breathing room on every side, and a level floor that can shed moisture, and getting those three right before the boxes arrive is what separates a clean weekend job from a re-do. This guide is the engineering and electrical checklist I wish I had been handed before I wired the dedicated circuit that feeds the cabin I run.
I write this from the install side, not the wellness side. Over years of living with far-, near-, and full-spectrum units in a Swedish home, I have pulled panels, metered the EMF off every heater type, chased cold spots with a thermal camera, and rewired the circuit more than once to get the routing clean. What follows is the order of operations that actually works, the numbers that matter, and the mistakes I made so you do not have to. Where the rules get jurisdiction-specific, I will say so and point you to a licensed electrician, because the one thing worse than a wrong clearance is a wrong wiring claim. If you want the friendly first-timer walkthrough alongside this engineering view, the home setup guide covers the gentler version.
What Power Does an Infrared Sauna Actually Need?
Most one- and two-person infrared cabins draw 15 to 20 amps on a standard 120V circuit and need a single dedicated line; larger full-spectrum and four-person units often require a 240V/30A circuit. The deciding number is on the unit’s spec plate, not the marketing page. A cabin rated at 1,600 watts on 120V pulls about 13.3 amps, which is already too close to a shared 15A circuit’s comfort ceiling once you add anything else on the line.
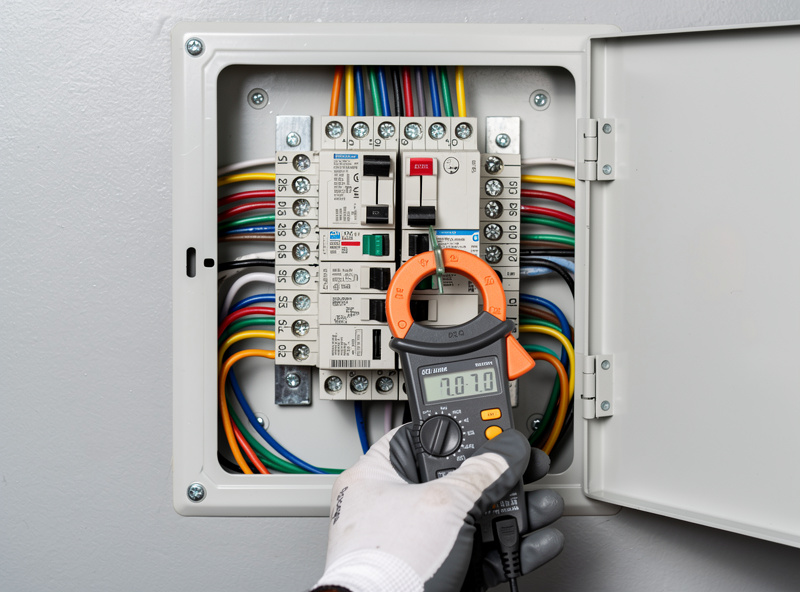
The rule I follow: read the nameplate amperage, give it a dedicated circuit one size up, and never share it with lights, a treadmill, or a space heater. A dedicated circuit is not a luxury here. Infrared heaters pull steady, near-continuous current the entire session, which is exactly the load profile that nuisance-trips a shared breaker and cooks marginal wiring over time. If you only take one thing from this guide, take that: the electricity and the circuit are the real install, and the cabin is the easy part.
120V vs 240V: Which Circuit Does Your Cabin Need?
The split is simple once you have the nameplate watts. Below roughly 1,800 watts a unit can live on a dedicated 120V/20A circuit; above that, manufacturers typically spec 240V, which halves the current for the same power and keeps the wiring cooler. Here is how the common cabin sizes line up against the circuit they usually call for.
| Cabin size | Typical power draw | Voltage | Dedicated circuit | Plug type |
|---|---|---|---|---|
| 1-person far-infrared | 1,200–1,500 W | 120V | 15–20A | Standard 5-15 / 5-20 |
| 2-person far-infrared | 1,500–1,800 W | 120V | 20A | 5-20 |
| 2-person full-spectrum (NIR added) | 1,800–2,400 W | 120V or 240V | 20A or 240V/20A | 5-20 or 6-20 |
| 3–4-person | 2,400–3,600 W | 240V | 30A | Hardwired or 6-30 |
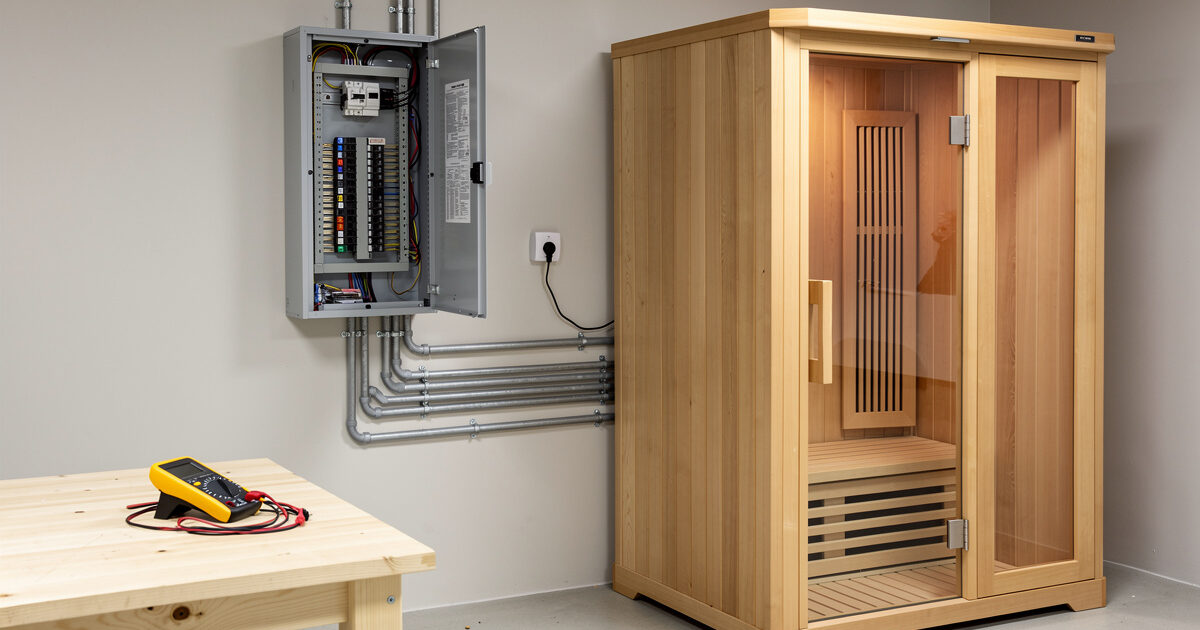
Note that a “full-spectrum” cabin earns its higher draw from the near-infrared halogen emitter, which is a genuinely power-hungry bulb, not a marketing flourish. If you are weighing wavelength bands, the near vs far vs full-spectrum breakdown explains what each band costs in watts. And whichever line you run, GFCI protection is the non-negotiable safety layer in any room where moisture and bare feet meet electricity. The 240V breaker sizing walkthrough — load calculation, double-pole spec, and the continuous-load 80% rule — is in the 240V breaker requirements guide.
Where Should You Install an Infrared Sauna?
The best spot is an interior room with a level floor, a dedicated circuit within reach, and a few inches of clearance on every side; bathrooms, spare bedrooms, basements, and finished garages all work if you respect the heat and moisture. The cabin radiates outward, so it should not be jammed against drywall or wedged into an alcove that traps warm air against a wall.
I keep at least the manufacturer’s stated clearance behind and beside the unit, and I never sit it directly under a low ceiling that will pool heat. Carpet is the worst floor choice; it traps the slight moisture from sweat and blocks the airflow the cabin base needs. For a room-by-room placement tour I point readers to the existing room-by-room placement guide, and apartment dwellers should read the small-space setup guide before committing to a spot. For a room-by-room comparison covering basement, garage, spare bedroom, and bathroom trade-offs, see the where to install an infrared sauna guide. If you are weighing a spare bedroom against a garage install specifically, the indoor vs. garage infrared sauna comparison walks the temperature, moisture, and power trade-offs side by side.
Flooring and Clearance: The Two Things People Skip
Infrared cabins need a level, moisture-tolerant floor and a clearance gap of a few inches on every side for airflow and heat dissipation. Tile, sealed concrete, and vinyl plank are ideal; carpet and unsealed wood are problems. The clearance is not cosmetic. The cabin’s exterior stays cool, but the air around it carries heat away, and choking that gap is how you get a hot wall and a cabinet that ages unevenly.
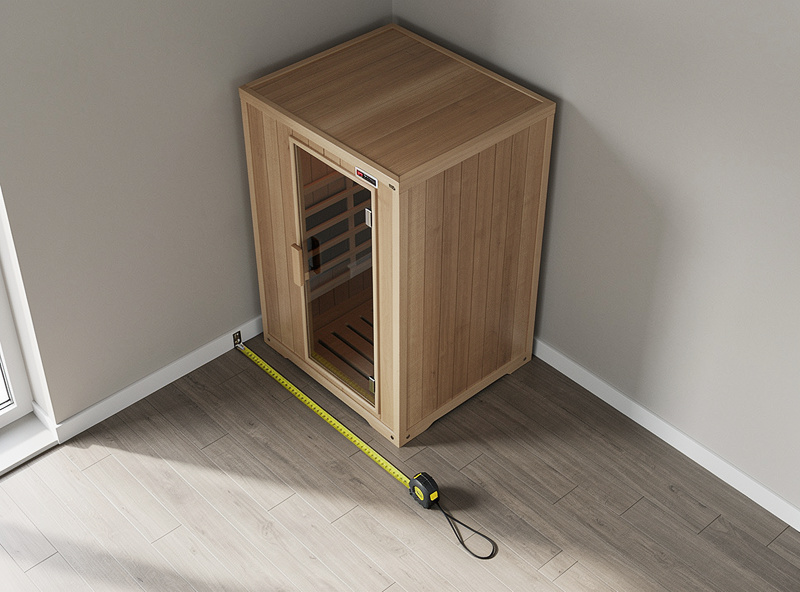
On my install I run the cabin on vinyl plank over a level subfloor, with the manufacturer’s clearance held on all four sides and a little extra behind the heater wall. If your floor is not level, shim and verify with a spirit level before assembly, because a racked frame is the most common cause of door-seal gaps that leak your preheat. Getting the floor and the gaps right is unglamorous, but it is the foundation the rest of the install sits on, literally. Material-by-material ratings and exact clearance tables are in the sauna flooring and clearance guide.
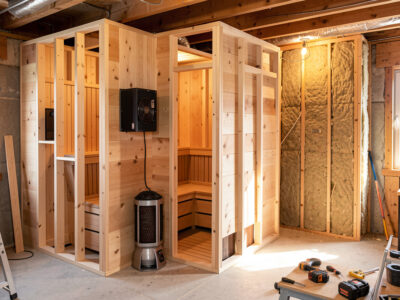
How Hard Is Infrared Sauna Assembly?
Most prefab infrared saunas use a buckle-together or clip panel system that two people can assemble in 60 to 120 minutes with no special tools beyond a screwdriver. The panels are pre-wired; you are joining walls, dropping in the roof, connecting labeled heater and control harnesses, and seating the glass door. The work is straightforward, but the order matters and the connectors are unforgiving if forced.
The two steps people rush are the wall-to-wall buckles (snug them evenly so the frame stays square) and the wiring harnesses (each is keyed and labeled, so never force a mismatched plug). I lay every panel out and inventory the hardware before I start, because a missing buckle mid-build means a stalled cabin sitting open in your room. Square the frame first, seat the door last, and the glass will close with a clean, even seal.
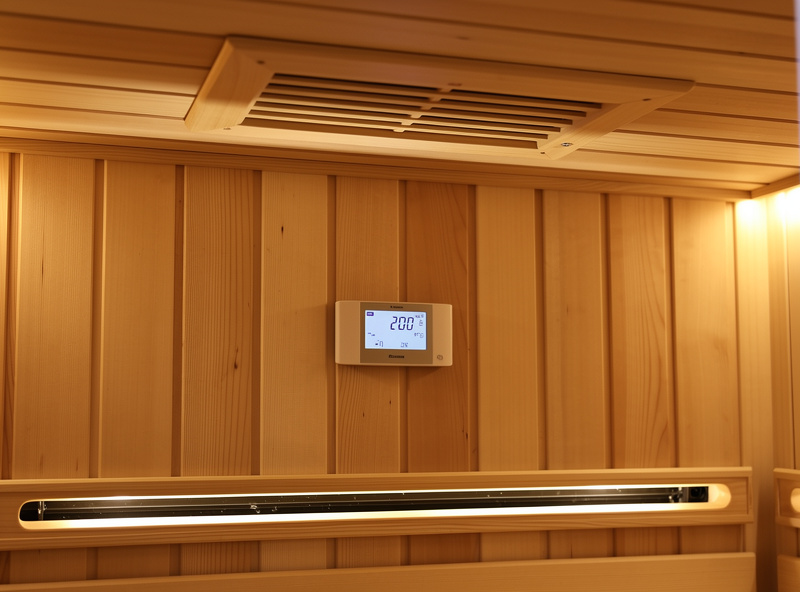
Why Ventilation Matters More Than You Think
An infrared cabin needs passive ventilation, typically a floor-level intake and a ceiling or upper-wall vent, to manage the small amount of humidity from sweat and to keep fresh air moving during a session. Infrared saunas run cooler and drier than traditional steam rooms, but they are not zero-humidity, and a sealed box traps moisture in the wood over time.
As an Amazon Associate I earn from qualifying purchases. Some links below are affiliate links, at no extra cost to you.
Most cabins ship with an adjustable ceiling vent; I leave mine cracked during sessions and fully open for an hour afterward to let the interior dry. In a tight, unventilated room I crack the door of the room itself too. The humidity I read on a cheap hygrometer rarely climbs far, but “rarely far” still cups wood over a winter if it never dries out. Treat the post-session dry-out as part of the routine, not an afterthought, and the hemlock or cedar will stay flat for years.
Wiring an Outlet for a Sauna (When You Need One)
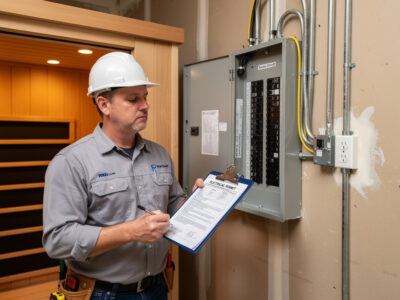
If your room lacks a dedicated circuit, you will need an electrician to run one from the panel and install a properly rated GFCI-protected outlet or hardwire connection. This is the one step I will not tell you to DIY unless you are genuinely qualified, because the load is continuous and the environment is damp. A miswired or undersized outlet here is a fire risk, not a cosmetic flaw.
What you can do is the planning: identify the nearest panel route, confirm there is a free breaker slot, and decide between an outlet and a hardwired connection based on the cabin’s plug. For off-grid setups, the existing off-grid sauna power piece covers solar and battery sizing for the same resistive load, which is a surprisingly demanding profile for an inverter to hold.
Do You Need a Permit or to Meet Code?
Plug-in 120V infrared cabins usually need no permit, but any new circuit, 240V wiring, or hardwired connection typically requires an electrical permit and an inspection in most jurisdictions. The cabin itself is furniture; the wiring that feeds it is regulated. Rules vary by region and you should confirm with your local building department, but the general line is: if a wire moves inside your wall, a permit is likely involved.
For outdoor and detached installs the bar is higher, since you are often adding a foundation, weatherproofing, and a buried or conduit-run feed. The existing outdoor sauna foundation, power, and permits piece covers that case, and the backyard setup guide walks the pad-and-power side. When in doubt, a 30-minute call to your local inspector is cheaper than a failed inspection. For a jurisdiction-by-jurisdiction breakdown of what triggers a permit and how to prepare your paperwork, see the infrared sauna permits and code compliance guide.
Wood, Glass, and the Materials That Affect Your Install
The cabin material decides how the unit handles the moisture your install has to manage, so it is an install concern as much as an aesthetic one. Most home far-infrared cabins are Canadian hemlock or basswood, with cedar showing up on some lines; hemlock is the comfort and EMF benchmark I measure others against because it is stable, low-resin, and dimensionally well-behaved in a heated, occasionally humid box. Cedar smells wonderful but its oils and stronger aroma are not to everyone’s taste in a small space.
The practical install takeaway is that whatever the wood, it wants to dry out between sessions, which loops straight back to ventilation. A well-ventilated hemlock cabin in conditioned space will stay flat and tight for years; the same cabin sealed in a humid, unventilated room will eventually cup at the panel seams. The glass door is the other material variable: a full-glass front looks striking but radiates heat outward, so leave its swing arc clear and do not seat anything heat-sensitive directly in front of it. None of these choices are hard, but they are easier made before the cabin is built than after, which is the recurring theme of every good install.
Install Wiring and EMF: The Detail Nobody Plans For
The wiring you run to the cabin, and the way the cabin’s own internal harness is routed, both contribute to the magnetic and electric field readings inside the box. On my TriField meter, the largest field source is rarely the far-infrared panels themselves; it is the controller, the power cord, and any wiring that runs close to where you sit. This is the part of an install that the spec sheet never mentions and that almost no buyer measures.
“Low-EMF” labeling mostly refers to how the manufacturer routes and shields the heater wiring so the magnetic field at the seat is low; it does not change the physics of the feed circuit you run to the wall. Two practical install moves help: keep the supply cord from coiling behind the bench where you lean, and avoid running the feed cable directly alongside other live circuits in the wall. The field falls off quickly with distance, so a few inches of routing discipline meaningfully moves the milligauss reading. If you want to verify your own cabin, a magnetic-field meter held at seat height during a session is the only honest way to know, because a sticker is not a measurement. I keep a cheap cross-check meter alongside the TriField precisely because a single reading from one instrument is easy to fool yourself with. For the full measurement protocol — which mode to use for AC magnetic, AC electric, and RF, and what the numbers actually mean — the how to measure infrared sauna EMF with a TriField guide walks through every step.
None of this is a health claim. Researchers and standards bodies have studied low-frequency field exposure for decades and the guidance is still evolving; I treat EMF as an engineering quantity I can measure and reduce, not as a danger I am promising you about. The point of metering is buyer confidence and clean install practice, not fear.
Electrical Safety: GFCI, Grounding, and the Continuous-Load Rule
An infrared sauna is a continuous load, meaning it draws near its rated current for three hours or more if you run back-to-back sessions, and continuous loads are the case where conductor and breaker sizing margins matter most. The standard electrical practice of sizing a circuit so the continuous load does not exceed 80 percent of the breaker rating is exactly why a 1,600-watt cabin belongs on a 20-amp circuit rather than a 15. That headroom is not waste; it is what keeps the breaker and the wire from running warm for an hour at a time.
GFCI protection is the other pillar. Any circuit feeding a device in a damp or sweat-prone environment should be GFCI-protected, either at the breaker or at the receptacle, so a ground fault trips the power before it finds a person. Proper grounding of the cabin’s metal chassis and a correctly bonded outlet complete the picture. I will say plainly: if you are not confident reading a breaker rating against a nameplate amperage and identifying a GFCI device, this is the step to hand to a licensed electrician. The cost of the visit is trivial next to the cost of getting a continuous, damp-environment circuit wrong.
What the Install Costs to Run
The number most buyers never calculate before installing is the electricity per session, and it is small but not nothing. A 1,600-watt cabin running for a 45-minute session, including preheat, draws roughly 1.2 to 1.6 kilowatt-hours, which on my kill-a-watt meter lands in a predictable band across the heaters I have lived with. At typical residential rates that is a modest per-session figure, but the preheat is where a careless install wastes power: a cabin in a cold garage takes far longer to come up to set temp than the same unit in a conditioned room.
This is the quiet argument for installing in heated interior space when you can, and for putting the cabin on a smart plug so it preheats on a schedule rather than running empty while you decide to use it. The same smart-home rule engine that schedules other household loads can stage the sauna preheat to land exactly when you walk in. I dig into the kilowatt-hour math, rate sensitivity, and ROI in the dedicated running-cost breakdown, but the install lesson is simpler: a warm, well-clearanced, well-ventilated cabin in conditioned space is the cheapest one to run.
The Install Mistakes I See Most
After years of helping people sort their setups, the same handful of errors come up again and again, and every one of them is preventable at the planning stage. Sharing the circuit is the most common and the most dangerous: a sauna on the same breaker as a bathroom outlet or a laundry circuit will trip under load and stress the wiring. Skipping the clearance gap is second, usually because the chosen spot was an inch too tight and someone decided it was close enough.
The third is ignoring ventilation entirely and then being surprised when the interior smells musty after a winter. The fourth is an unlevel floor that racks the frame and leaves a door-seal gap leaking heat. And the fifth, the one that costs the most, is buying a cabin whose nameplate needs 240V and discovering only on delivery day that the room has nothing but a shared 120V outlet. Every one of these is solved by reading the spec plate and walking the room with a tape measure and a circuit tester before you order, which is exactly what the pre-install checklist below forces you to do.
My Pre-Install Checklist
Before the cabin arrives, I run a five-point check: confirm the nameplate amperage and matching dedicated circuit, verify a level moisture-tolerant floor, mark the clearance footprint on the floor with tape, confirm a ventilation path, and book the electrician if a new circuit is needed. Doing this in the week before delivery turns assembly day into a 90-minute job instead of a series of trips to the hardware store.
If you are buying rather than installing today, the home infrared sauna overview and the best home cabins roundup pair well with this checklist. And once you are running, the temperature and session length guides cover dialing the unit in, while the beginner schedule sets a sensible first month. The cabin is the part you unbox; the install is the part you live with, and an hour of planning before delivery pays you back every single session for as long as you own it.
Frequently Asked Questions
Does an infrared sauna need a dedicated circuit?
Yes. Most one- and two-person infrared cabins need a single dedicated 120V/20A circuit because they pull steady, near-continuous current. Sharing the line with other loads is the main cause of nuisance breaker trips and overheated wiring.
Can I plug an infrared sauna into a regular outlet?
A small 120V cabin can use a standard outlet only if it is on a dedicated circuit sized to the nameplate amperage. Many units need a 20A circuit, and larger full-spectrum cabins require 240V wiring instead.
How much clearance does an infrared sauna need?
Leave the manufacturer’s stated clearance, typically a few inches on every side, for airflow and heat dissipation. Never wedge the cabin tight against drywall, as that traps heat against the wall and ages the cabinet unevenly.
Do I need a permit to install an infrared sauna?
A plug-in 120V cabin usually needs no permit, but any new circuit, 240V wiring, or hardwired connection typically requires an electrical permit and inspection. Rules vary by jurisdiction, so confirm with your local building department.
What flooring is best under an infrared sauna?
Tile, sealed concrete, and vinyl plank are ideal because they are level and shed the slight moisture from sweat. Avoid carpet, which traps moisture and blocks the airflow the cabin base needs.
How long does it take to assemble an infrared sauna?
Most prefab cabins use a buckle or clip panel system that two people assemble in 60 to 120 minutes with just a screwdriver. The panels are pre-wired, so the work is joining walls and connecting keyed, labeled harnesses.